3. CRUD 게시판 프로젝트 - 디자인을 불러오고, 시큐리티를 이용해 회원가입과 로그인을 만들어보기
저번 글에서 저희가 게시판의 목록을 출력하고, 상세 보기가 가능하고 글을 작성하는 것까지 만들었습니다.
비록 편의 기능들이 빠져있는 허술한 웹페이지였지만, 이제 디자인을 가져오면서 편의 기능들을 하나씩 추가하려고 합니다.
1. Bootstrap 적용하기
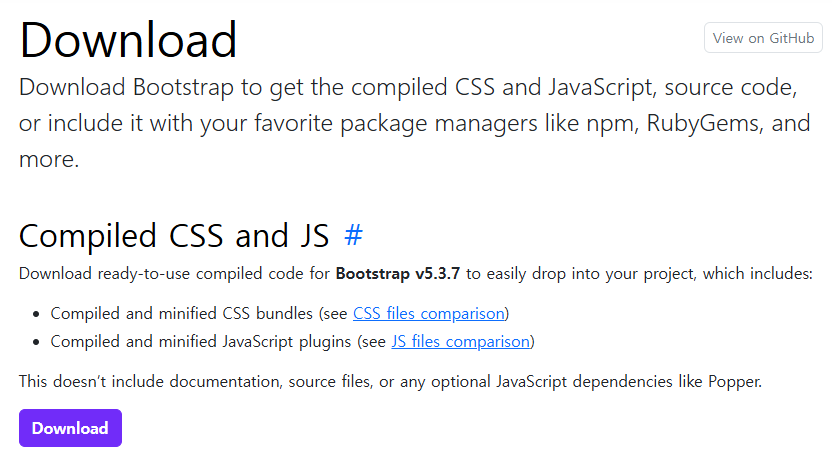
해당 사이트로 이동하게 되면 아래쪽에 Complied CSS and JS 쪽에 Download 버튼이 보이는 것을 볼 수 있습니다.
파일을 다운로드하게 되면 위 사진과 같은 압축 파일을 받으실텐데,
해당 압축 파일의 압축을 풀어주세요.
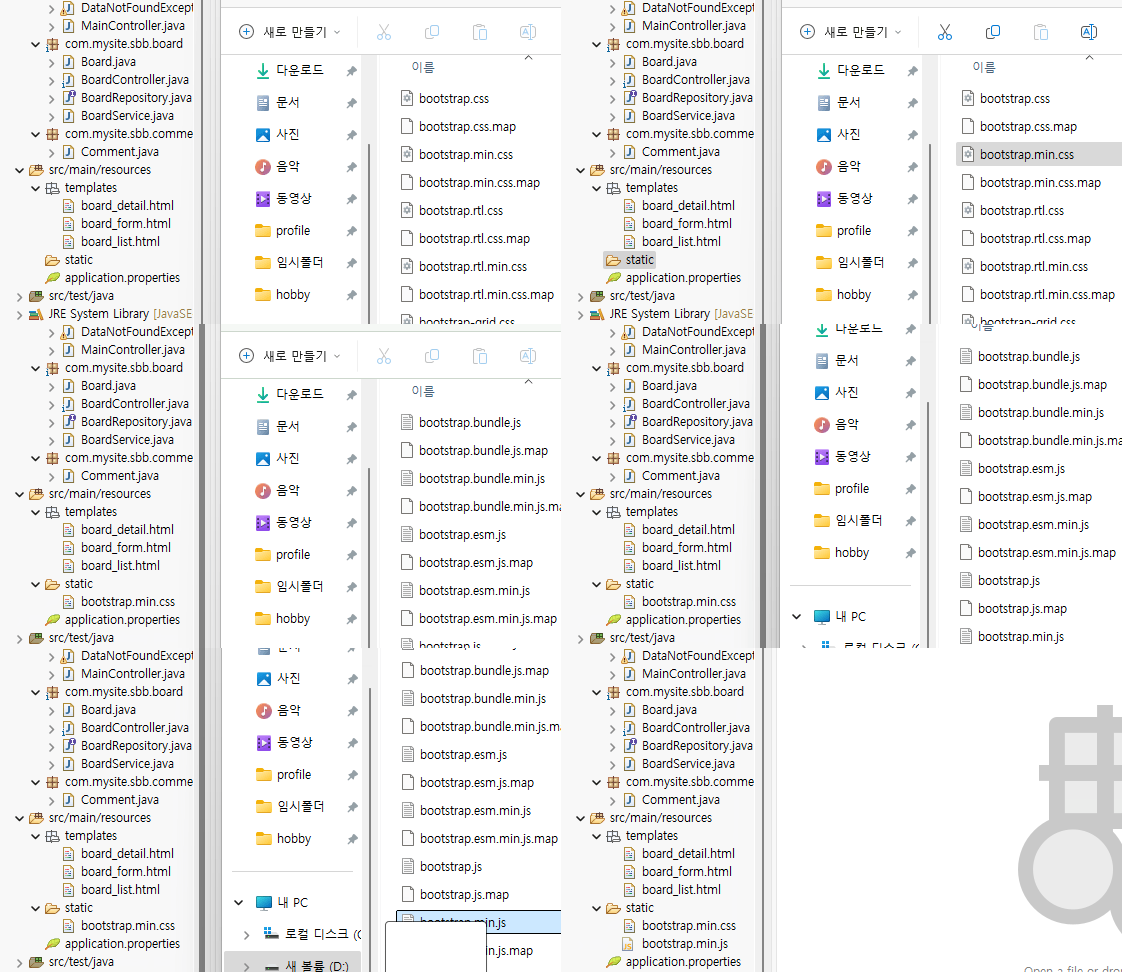
그리고 css 폴더에서 bootstrap.min.css 파일을, js 폴더에서 bootstrap.min.js 파일을 위 사진처럼 드래그 해줍니다.
파일은 Copy(복사)로 가져오시면 됩니다.
이렇게 파일을 가져왔으면 이제 사용할 준비를 해주는 것이 좋겠죠?
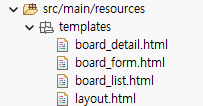
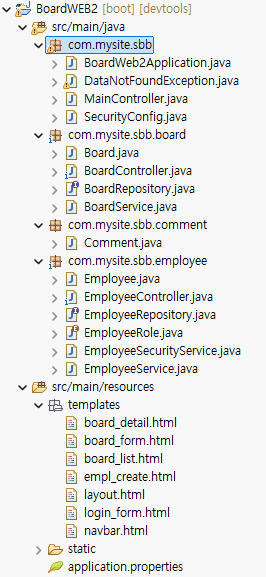
layout.html을 해당 위치에 만들어주세요.
언제나 말씀드리만 위치는 정말 중요합니다!
layout.html
<!DOCTYPE html>
<html lang="ko">
<head>
<meta charset="UTF-8">
<meta name="viewport"
	content="width=device-width, initial-scale=1, shrink-to-fit=no">

<!-- Bootstrap CSS -->
<link rel="stylesheet" type="text/css" th:href="@{/bootstrap.min.css}">
<title>탭 타이틀이 들어가는 자리</title>
</head>
<body>
	<!-- Bootstrap fragment -->
	<th:block layout:fragment="content"></th:block>

	<!-- Bootstrap JS -->
	<script type="text/javascript" th:src="@{/bootstrap.min.js}"></script>
</body>
</html>
<html lang="ko">
<meta charset="UTF-8">
해당 웹페이지가 한국어를 주로 사용할 것이라고 적어두는 느낌이라고 보면 될 것 같습니다.
또한, 한글 등 다른 문자들이 깨지지 않게 문자 인코딩을 UTF-8로 설정해주었습니다.
<meta name="viewport" content="width=device-width, initial-scale=1, shrink-to-fit=no">
모바일 환경에서도 글씨와 화면 크기가 자동으로 맞춰질 수 있도록 설정하였습니다.
<link rel="stylesheet" type="text/css" th:href="@{/bootstrap.min.css}">
저희가 설치한 Bootstrap을 가져오는 코드입니다.
<th:block layout:fragment="content"></th:block>
저희가 설치한 css를 사용하기 위한 것이라고 보면 좋습니다.
나중에 이것을 선언하면서 디자인을 끌고올 것입니다.
<script type="text/javascript" th:src="@{/bootstrap.min.js}"></script>
버튼/메뉴 등 동작에 필요한 Bootstrap 자바스크립트를 연결합니다.
이렇게 적어두었다면, 이제 연결할 준비가 끝난 상태입니다.
그럼 이제 게시글 목록 같은 곳에서 연결을 해주는 것이 좋겠죠?
board_list.html
<html layout:decorate="~{layout}">
<div layout:fragment="content">
    <table class="table">
        <thead>
            <tr>
                <th>번호</th>
                <th>제목</th>
                <th>작성일자</th>
            </tr>
        </thead>
        <tbody>
            <tr th:each="board : ${paging}">
                <td th:text="${board.id}"></td>
                <td><a th:text="${board.subject}"
                    th:href="@{|/board/detail/${board.id}|}"></a></td>
                <td th:text="${board.createDate}"></td>
            </tr>
        </tbody>
    </table>
</div>
</html>
<html layout:decorate="~{layout}">
이 줄을 적음으로서, HTML 파일은 layout 이라는 이름의 기본 틀 파일의 구조를 가져오겠다는 의미입니다.
즉, 이 파일은 layout.html을 바탕으로, 필요한 내용만 채워넣는 방식입니다.
나중에 여러가지 추가할 것이지만, 보통은 공통 메뉴, 헤더 등 반복되는 구조가 들어있고
각 페이지는 바뀌는 부분만 작성하면 됩니다.
<div layout:fragment="content">
이 부분은 content라는 이름의 fragment라는 뜻입니다.
아까 layout.html에서 <th:blocak layout:fragment="content"></th:block> 라고 적혀 있던 바로 그것!! 기억나죠?
여기 <div> 안에 있는 내용이 layout.html의
<th:blocak layout:fragment="content"></th:block> 자리에 자동으로 가져오는 겁니다.
이렇게 사용함으로서, 전체 레이아웃은 layout.html이 관리하고,
바뀌는 내용만 각 페이지에서 처리하는 방식으로 편하게 사용할 수 있습니다.
<table class="table">
아니!! 새로운 것이 생겼죠?
테이블은 클래스 테이블??
아까 Bootstrap을 설치하고 시작한 것을 기억하시나요?
class="table"은 Bootstrap에서 예쁜 표 디자인을 가져와주는 역할입니다.
제가 말했죠? 이제 이쁜 디자인 들어간다고!

예쁘게 잘 적용된 것을 볼 수 있는 게시판 환경!
이전에 게시판 같지도 않던 환경은 잊고, class 하나 넣은 것 만으로 이렇게 바뀌었습니다.
하지만 저흰 지금 board_list만 수정해주었고, board_detail은 수정하지 않았습니다.
그래서 링크를 눌러도 별로 이쁘지 않은 꾀죄죄한 모습인데요.
여기도 간단하게 수정해보고자 합니다.
board_detail.html
<html layout:decorate="~{layout}">
<div layout:fragment="content" class="container my-3">
	<div class="card">
		<h2 class="card-header" th:text="${board.subject}"></h2>
		<div class="d-flex justify-content-end mt-2 mx-2" th:text="${board.createDate}"></div>
		<div class="card-body" th:text="${board.content}"></div>
	</div>

	<a type="submit" class="btn btn-primary mt-3" href="/">돌아가기</a>
</div>
</html>
이전에 딱 2줄밖에 없었던 코드가 많이 늘어난 것을 볼 수 있습니다.
간단하게 돌아가는 버튼도 만들어두었고, 작성 날짜도 표시하면서 코드가 더 늘어난 것이죠!
<div layout:fragment="content" class="container my-3">...</div>
content는 위에서 이미 말을 했었고, "container my-3"라는 것이 새로 보일겁니다.
여기서 주의하셔아하는 것이 저렇게 적으면 container와 my-3.
각각 다른 2개의 클래스를 가져온 거라고 볼 수 있습니다.
먼저 container(컨테이너)는 Bootstrap에서 제공하는 가장 기본적인 레이아웃이라고 할 수 있습니다.
이 클래스를 넣어주지 않으면 좌우 여백 없이 화면 한가득 들어가기 때문에 넣어주면 좋습니다만,
혹시 특수한 컨셉 등 필요한 부분이 있다면 그에 맞춰서 사용하면 좋습니다.
더욱 자세한 정보는 컨테이너를 설명하는 부트스트랩 페이지로 들어가시면 볼 수 있습니다.
그리고 my-3은 y축으로. 즉, 위 아래로 공백을 주는 것입니다.
이건은 임의로 지정된 축약어로 들어가기 때문에,
이것 또한 부트스트랩에서 제공되는 간격 페이지로 들어가시면 용어를 확인할 수 있습니다.
card, card-header, card-body 등 card 관련
이 또한! 저희가 아까 가져온 Bootstrap에서 가져온 것입니다.
카드 형태의 박스를 만들어주는 코드입니다.
먼저 card-header은 게시글의 제목을 적어두는 디자인으로서 내용과 분리하기 위해서 적어뒀습니다.
그래서 제목이 적힌 <h2>에 class가 들어가있는 것을 알 수 있습니다.
그리고 card-body는 게시글의 본문을 넣을 부분을 적기 위해서 만든 공간입니다.
평범하게 보기 좋은 여백을 제공해주고, 이것을 통해서 저희는
따로 공백(mx-2 라던가 mt-3 같은)을 주지 않고 공백을 줄 수 있습니다.
만약 더 자세히 확인하고 싶으시다면 이것도 부트스트랩에서 제공되는 카드 페이지를 들어가시면 됩니다.
d-flex, justify-content-end
게시글의 작성일자를 적기위해서 가져온 기능입니다.
작성일자를 오른쪽 끝으로 붙이기 위해서 사용했습니다.
이것들을 통해서 왼쪽, 가운데, 오른쪽 정렬이 가능하고,
자동으로 마진을 남겨준다거나 등등 여러가지 기능을 제공받을 수 있습니다.
여기도!! 더 자세히 확인하고 싶다면 부트스트랩의 플랙스 칸을 확인하면 된다는 사실!
자, 그러면 이만큼 했겠다.
이제 게시글 생성창으로 넘어가는 버튼도 만들고 생성할 때의 주소도 수정하고 이쁘게 꾸며줘야겠죠?
board_list.html
<html layout:decorate="~{layout}">
<!-- 기존에 있던 레이아웃 뒤에 공백을 주어 보기 좋게 변경! -->
<div layout:fragment="content" class="container mt-3">
    <table class="table">
        <thead>
            <tr>
                <th>번호</th>
                <th>제목</th>
                <th>작성일자</th>
            </tr>
        </thead>
        <tbody>
            <tr th:each="board : ${paging}">
                <td th:text="${board.id}"></td>
                <td><a th:text="${board.subject}"
                    th:href="@{|/board/detail/${board.id}|}"></a></td>
                <td th:text="${board.createDate}"></td>
            </tr>
        </tbody>
    </table>
    <!-- 새로 추가된 버튼 -->
    <a th:href="@{/board/create}" class="btn btn-primary">글 작성</a>
</div>
</html>
이렇게 글 작성하는 곳으로 이동하는 버튼을 만들고 잘 작동하는지 눌러줍니다.
아마 큰 이변이 없다면 글 작성 페이지로 잘 넘어갈 것입니다.
404 오류가 뜬다면 하이퍼링크가 잘못되었는지 확인해주세요~!
board_form.html
<html layout:decorate="~{layout}">
<div layout:fragment="content" class="container my-3">
    <form th:action="@{/board/create}" method="post">
        <h2>글 작성하기</h2>
        <div class="container">
            <div class="input-group my-3">
                <input type="text" class="form-control" placeholder="제목" name="subject" id="subject">
            </div>
            <div class="input-group my-3">
                <textarea class="form-control" rows="10" placeholder="내용" name="content" id="content"></textarea>
            </div>
        </div>
        <div class="row justify-content-between">
            <a type="submit" class="col-2 btn btn-outline-danger" th:href="@{/}">돌아가기</a>
            <input type="submit" class="col-2 btn btn-primary" value="글 등록">
        </div>
    </form>
</div>
</html>
만약 이것을 다 적었다면, 당신의 초라했던 글 작성폼은 이제 안녕...
멋진 모습으로 돌아온 글 작성 페이지가 당신을 기다리고 있을겁니다!
input-group, form-control
먼저 input-group은 무엇일까요?
말 그대로, 입력을 받는 그룹을 속하는 말입니다.
이 안에 input 타입이 text인 친구가 2개가 들어가있으면?
한 줄에서 2개의 칸이 입력을 받으려고 준비하고 있을겁니다.
그냥 한 줄에서 받는 그룹을 묶어주는 것이라고 생각하면 편할 것 같습니다.
이 그룹의 크기를 바꿔주는 것으로 입력을 하는 공간을 재조정시킬 수 있습니다.
form control은 이 곳이 입력하는 공간이라는 것을 정의하는 겁니다.
솔직히 큰 뜻은 모르겠습니다. 이게 맞는듯?

만약 더 자세하게 알고싶으시다면 이번에도 사랑받는 부트스트랩의 크기조절 페이지를 확인해주세요.
placeholder
글을 쓰는 text-field or textarea가 준비되었다면,
그곳에 무엇을 적는 것인지 알려줘야 할 때가 있습니다.
하지만 위에 따로 라벨을 붙여주기엔 가끔 없는 것이 더 이쁘다고 생각할 때가 있죠?
그 때를 위한 파격적인 아이템!!
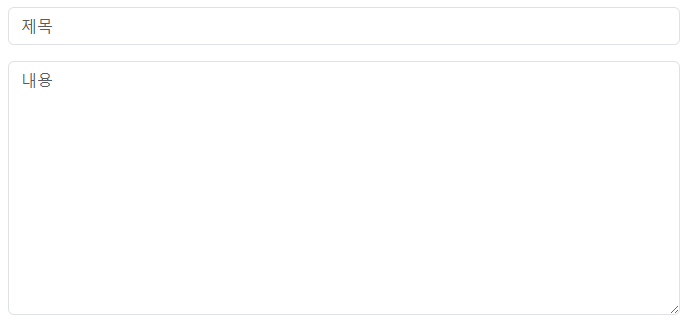
이렇게 쉽게 한 눈에 알 수 있도록 알려주는 코드입니다.
하나씩 하나씩보면 어렵지 않죠?
이렇게 제목과 내용을 적고... 등록을 누르면...
아뿔싸! 저희는 다시 작성 폼으로 돌아오는 것을 확인할 수 있습니다.
저희가 처음에 컨트롤러에서 경로를 등록 폼으로 설정해둔 것을 아직 변경하지 않아서 이런 일이 일어나는 것입니다.
게시글이 등록된 것은 돌아가기 버튼을 이용해서 확인할 수 있으니, 이제 수정하러 가볼까요?
BoardController.java
@PostMapping("/create")
public String createBoard(@RequestParam("subject") String subject, @RequestParam("content") String contet) {
    this.boardService.createBoard(subject, contet);
    return "redirect:/board/create";
}

// ▼▼▼▼▼▼▼▼▼▼▼▼▼▼▼▼▼▼▼▼▼▼▼▼▼▼▼
// ▼▼▼▼▼▼▼▼▼▼▼▼▼▼▼▼▼▼▼▼▼▼▼▼▼▼▼

@PostMapping("/create")
public String createBoard(@RequestParam("subject") String subject, @RequestParam("content") String contet) {
    this.boardService.createBoard(subject, contet);
    return "redirect:/";
}
이렇게 변경해주고 다시 글을 작성해보면?
글이 잘 등록되는 것을 확인할 수 있습니다.
아니, 등록은 원래 잘 되었고 목록으로 잘 나오는 것을 볼 수 있습니다!
그럼 이제 왔다갔다 하는 것은 완료되었으니,
이제 처음에 봉인해두었던 security의 주석 처리를 해제해줄 때가 되었습니다..
build.gradle
dependencies {
	implementation 'org.springframework.boot:spring-boot-starter-data-jpa'
	implementation 'org.springframework.boot:spring-boot-starter-security'
	implementation 'org.springframework.boot:spring-boot-starter-thymeleaf'
	implementation 'org.springframework.boot:spring-boot-starter-validation'
	implementation 'org.springframework.boot:spring-boot-starter-web'
	implementation 'org.thymeleaf.extras:thymeleaf-extras-springsecurity6'
	implementation 'nz.net.ultraq.thymeleaf:thymeleaf-layout-dialect'
	compileOnly 'org.projectlombok:lombok'
	developmentOnly 'org.springframework.boot:spring-boot-devtools'
	runtimeOnly 'com.h2database:h2'
	annotationProcessor 'org.projectlombok:lombok'
	testImplementation 'org.junit.jupiter:junit-jupiter'
	testImplementation 'org.springframework.boot:spring-boot-starter-test'
	testImplementation 'org.springframework.security:spring-security-test'
	testRuntimeOnly 'org.junit.platform:junit-platform-launcher'
}
build.gradle 안에 있는 주석을 전부 지워주시고, 그래들 리프래시를 진행해주세요.
그리고 서버가 만약 켜져있다면 한 번은 껏다 켜주시기 바랍니다.
그리고 서버를 다시 켜주시면
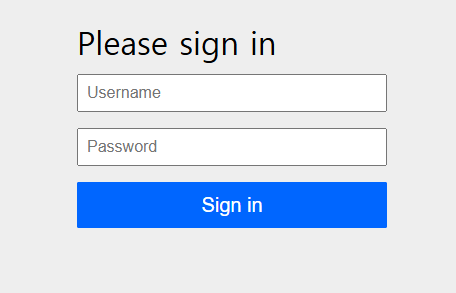
아이고, 여기가 내 집이다 이놈아!!
감히 나를 막아서느냐!!
싶겠지만, 아마 서버를 켜면서 받은 패스워드(열쇠)가 있을겁니다.

Username에는 user을 적어주시고,
Password에는 콘솔에 적힌 모자이크 된 저 값을 넣어주시면 됩니다.
이렇게 보안을 통과하고 나면 자연스럽게 평소처럼 화면이 잘 나오는 것을 볼 수 있습니다.
하지만 저희가 들어올 때마다 계속 이런식으로 인증을 받고 들어오는 것은 많이 귀찮습니다.
그래서 저흰 시큐리티를 제어해줄 클래스를 만들어줘야 합니다.

SecurityConfig 클래스를 해당 위치에 만들고, 저흰 여기에서 시큐리티를 조작할겁니다.
SecurityConfig.java
package com.mysite.sbb;

import org.springframework.context.annotation.Configuration;
import org.springframework.security.config.annotation.web.builders.HttpSecurity;
import org.springframework.security.config.annotation.web.configuration.EnableWebSecurity;
import org.springframework.security.web.SecurityFilterChain;

@Configuration
@EnableWebSecurity
public class SecurityConfig {
    @Bean
    SecurityFilterChain filterChain(HttpSecurity http) throws Exception{
        http.authorizeHttpRequests(authorizeHttpRequests -> authorizeHttpRequests.requestMatchers("/**").permitAll());
        return http.build();
    }
}
@Configuration
이 클래스가 설정 파일임을 스프링에게 알려주는 어노테이션이라고 볼 수 있습니다.
@EnableWebSecurity
스프링 시큐리티라는 보안 기능을 우리가 프로젝트에서 적용하겠다고 알리는 어노테이션입니다.
SecurityFilterChain filterChain(HttpSecurity http) throws Exception
웹사이트의 보안 규칙을 설정하는 곳입니다.
- HttpSecurity http
http 보안인 것 같은데, 아무래도 주소를 받는 역할인 것 같습니다.
- throws Exception
만약에 오류가 발생할 수 있으니, 오류가 발생할 경우 외부로 에러를 던지겠다는 의미입니다.
http.authorizeHttpRequests(authorizeHttpRequests ->
    authorizeHttpRequests.requestMatchers("/**").permitAll()
);
authorizeHttpRequests
사이트에서 들어오는 요청이 누구에 의해 어떤 주소에 접근되는지를 관리하는 부분입니다.
requestMatchers("/**")
"/" 로 시작되는 모든 주소를, 즉 사이트의 모든 페이지를 의미합니다.
- 이건 저의 감각적인 느낌입니다만, 자바에서 *로 표시된 것은 모두를 포함하는 의미로 생각하고 있습니다.
"단어*" 이면 단어 뒤에 오는 모든것이든 괜찮다는 의미로,
"*단어" 면 단어 앞에 오는 것이 어떤 것이든 괜찮다는 의미로.
물론 제가 감각적으로 느끼는 것이기 때문에 꼭 알고있을 필요는 없습니다.
permitAll()
누구든지 접근을 허용한다는 뜻입니다.
로그인을 하지 않은 사람도 모두 사이트를 볼 수 있게 하기 위해서 적어둔 코드입니다.
return http.build()
위에서 설정한 보안 규칙을 적용해서 웹사이트에 반영하는 코드라고 보면 될 것 같습니다.
이렇게 보안 설정이 끝났다면, 일단 저흰 회원가입을 먼저 진행하려고 합니다.
"이렇게 갑자기요?"
네, 보안을 들어간 만큼 로그인/로그아웃은 시큐리티에서 담당하기 때문에 진행하려고 합니다.
이러면 이제 유저 정보를 받을 테이블을 만들어야합니다.
Employee.java
package com.mysite.sbb.employee;

import java.time.LocalDateTime;

import jakarta.persistence.Column;
import jakarta.persistence.Entity;
import jakarta.persistence.GeneratedValue;
import jakarta.persistence.GenerationType;
import jakarta.persistence.Id;
import lombok.Getter;
import lombok.Setter;

@Getter
@Setter
@Entity
public class Employee {
	@Id
	@GeneratedValue(strategy = GenerationType.IDENTITY)
	private Integer id;

	@Column(length = 6)
	private String nickname;

	@Column(unique = true)
	private String username;
	private String password;

	@Column(unique = true)
	private String email;
	private LocalDateTime createDate;
}
유저 정보를 받을 테이블입니다.
아이디와 닉네임, 비밀번호, 이메일을 받고 언제 가입했는지를 적으려고 필드를 짜두었습니다.
여기서 의미적으로 아는 것은 패스하고 새로 보는 것이 있는데,
※ 저장을 자주 하시는 분이라면, unique = true를 적기 전에 저장을 할 경우 unique가 적용이 안 될 수 있습니다.
unique = true
그것은 바로 유니크입니다.
일단 꺼무위키에서 알려주는 꺼무적 의미로는 유일무이한 정도의 의미를 가지고있다고 합니다.
즉, 유니크가 true라는 것은 중복이 나올 수 없다는 것입니다.
아이디는 중복이 되면 당연히 곤란하기 때문에 설정해두었고,
요즘은 이메일도 중복으로 가입되는 것을 막는 걸로 알고있습니다.
그렇기 때문에 이메일에도 true로 유니크를 걸어두었습니다.
만약 중복 가입이 가능하게 하고싶다면 유니크를 지워주시면 됩니다.
그럼 이제 회원가입을 만들기 위해서 컨트롤러로 이동해볼까요?
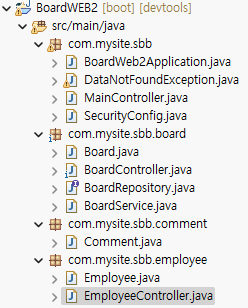
회원가입처럼 다른 테이블의 정보를 설정하는 컨트롤러는 따로 만들어줍니다.
각자 해당 패키지 안에서 정보가 도는 것이 대부분?인 것 같습니다.
EmployeeController.java
package com.mysite.sbb.employee;

import org.springframework.stereotype.Controller;
import org.springframework.web.bind.annotation.GetMapping;
import org.springframework.web.bind.annotation.RequestMapping;

import lombok.RequiredArgsConstructor;

@Controller
@RequiredArgsConstructor
@RequestMapping("/empl")
public class EmployeeController {
	@GetMapping("/create")
	public String emplCreate() {
		return "empl_create";
	}
}
시작은 언제나 간단하게!
먼저 간단하게 매핑이 지정하고

empl_create를 만들어줍니다.

정상적으로 빈 화면이 잘 뜨는 모습!
매핑이 제대로 된 것을 확인할 수 있습니다.
그럼 이제 레포지트리랑 서비스를 먼저 만들어보겠습니다.
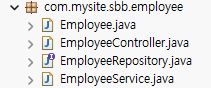
EmployeeService.java
package com.mysite.sbb.employee;

import java.time.LocalDateTime;

import org.springframework.stereotype.Service;

import lombok.RequiredArgsConstructor;

@Service
@RequiredArgsConstructor
public class EmployeeService {
	private final EmployeeRepository employeeRepository;

	public Employee create(String nickname, String username, String email, String password) {
		Employee employee = new Employee();
		employee.setNickname(nickname);
		employee.setUsername(username);
		employee.setEmail(email);
		employee.setCreateDate(LocalDateTime.now());
		employee.setPassword(password);
		this.employeeRepository.save(employee);

		return employee;
	}
}
이렇게 서비스를 만들고 나면, 컨트롤러로 넘어가서 세팅해줍니다.
EmployeeController.java
package com.mysite.sbb.employee;

import org.springframework.stereotype.Controller;
import org.springframework.web.bind.annotation.GetMapping;
import org.springframework.web.bind.annotation.PostMapping;
import org.springframework.web.bind.annotation.RequestMapping;
import org.springframework.web.bind.annotation.RequestParam;

import lombok.RequiredArgsConstructor;

@Controller
@RequiredArgsConstructor
@RequestMapping("/empl")
public class EmployeeController {
	private final EmployeeService employeeService;

	@GetMapping("/create")
	public String emplCreate() {
		return "empl_create";
	}

	@PostMapping("/create")
	public String emlpCreate(@RequestParam("username") String username, @RequestParam("password") String password, @RequestParam("nickname") String nickname, @RequestParam("email") String email) {
		this.employeeService.create(nickname, username, email, password);
		return "redirect:/";
	}
}
그리고 컨트롤러도 설정하면 html로 가나요?
아니요! 회원가입은 좀 특별하게 해줘야 하는 것이 있습니다.
그것은 비밀번호를 암호화해서 가져와야하기 때문이죠.
대부분의 사이트는 유저의 비밀번호를 그대로 가지고 있는 경우가 드문 편에 속합니다.
그래서 저희는 시큐리티에서 비밀번호 암호화를 시켜줄 메서드를 만들 것입니다.
SecurityConfig.java
package com.mysite.sbb;

import org.springframework.context.annotation.Bean;
import org.springframework.context.annotation.Configuration;
import org.springframework.security.config.annotation.web.builders.HttpSecurity;
import org.springframework.security.config.annotation.web.configuration.EnableWebSecurity;
import org.springframework.security.crypto.bcrypt.BCryptPasswordEncoder;
import org.springframework.security.crypto.password.PasswordEncoder;
import org.springframework.security.web.SecurityFilterChain;

@Configuration
@EnableWebSecurity
public class SecurityConfig {
	@Bean
	SecurityFilterChain filterChain(HttpSecurity http) throws Exception{
		http.authorizeHttpRequests(authorizeHttpRequests -> authorizeHttpRequests.requestMatchers("/**").permitAll());
		return http.build();
	}

    // 새로 추가된 메서드
	@Bean
	PasswordEncoder passwordEncoder() {
		return new BCryptPasswordEncoder();
	}
}
이렇게 비밀번호 암호화 준비를 마치고!
EmployeeService.java
package com.mysite.sbb.employee;

import java.time.LocalDateTime;

import org.springframework.security.crypto.password.PasswordEncoder;
import org.springframework.stereotype.Service;

import lombok.RequiredArgsConstructor;

@Service
@RequiredArgsConstructor
public class EmployeeService {
	private final EmployeeRepository employeeRepository;
	private final PasswordEncoder passwordEncoder;

	public Employee create(String nickname, String username, String email, String password) {
		Employee employee = new Employee();
		employee.setNickname(nickname);
		employee.setUsername(username);
		employee.setEmail(email);
		employee.setCreateDate(LocalDateTime.now());
		employee.setPassword(passwordEncoder.encode(password));
		this.employeeRepository.save(employee);

		return employee;
	}
}
여기에서 비밀번호를 암호화 시켜줍니다.
PasswordEncoder passwordEncoder() {return new BCryptPasswordEncoder();}
여기서 passwordEncoder는 비밀번호를 암호화하거나, 암호가 맞는지 확인하는 역할을 하는 인터페이스입니다.
new BCryptPasswordEncoder을 사용해서 BCrypt라는 암호화 방식을 사용해 비밀번호를 단방향 암호화를 해줍니다.
즉 비밀번호를 1234로 입력해도 데이터베이스에서는 전혀 다른 번호가 저장된다는 소리!
"이런게 왜 필요한가요?"
저도 정확하게는 모르겠지만, 보안을 위해서 암호화를 꼭 해야한다고 합니다.
암호화를 하지 않고 저장할 경우 해킹당할 위험이 올라간다는 얘기가 있습니다.
그래서 Spring Security에서는 로그인 시 입력한 비밀번호와 DB에 저장된 암호화된 비밀번호를 비교할 때
PasswordEncoder를 사용합니다.
이번에 새로본 것은 이거 하나가 전부입니다.
다른 코드는 다 알고 있는 것이죠?
그러면 이제 HTML을 수정해보겠습니다.
empl_create.html
<html>
<form th:action="@{/empl/create}" method="post">
	<div>
		아이디 <input type="text" name="username" id="username">
	</div>
	<div>
		닉네임 <input type="text" name="nickname" id="nickname">
	</div>
	<div>
		비밀번호 <input type="password" name="password" id="password">
	</div>
	<div>
		이메일 <input type="email" name="email" id="email">
	</div>
	<input type="submit" value="회원가입">
</form>
</html>
이렇게 적고 한번 회원가입을 해볼까요?
결과를 바로 확인할 수 없으니, 회원가입 후 h2 DB로 이동합니다.
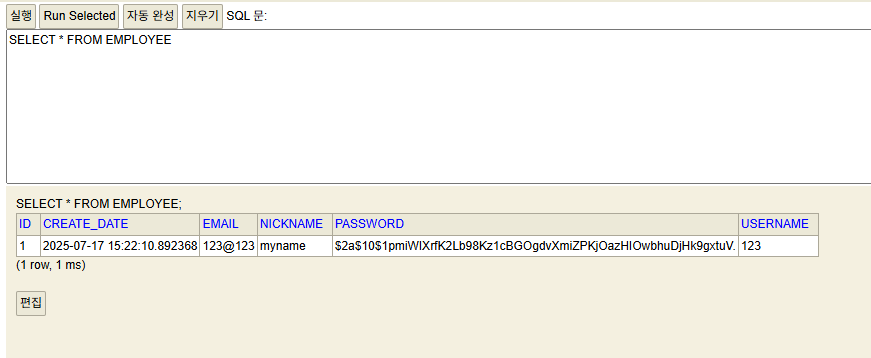
회원가입도 잘 되어있고 암호화도 잘 된 것을 확인할 수 있습니다.
이제 회원가입이 끝났으면 무엇이 남았죠?
그렇습니다 로그인을 해야합니다.
로그인은 간단하게 할 수 있으니 걱정하지마세요!!
하지만 문제가 있습니다..!!
그것은 중복 가입을 할 경우, 오류가 뜬다는 것..!
그것은 추후 유효성 검사에 대해서 설명할 때 함께 처리할 것이니 걱정하지마세요!
일단은 '패스!' 하고 로그인을 먼저 진행해보겠습니다.
SecurityConfig.java
package com.mysite.sbb;

import org.springframework.context.annotation.Bean;
import org.springframework.context.annotation.Configuration;
import org.springframework.security.config.annotation.web.builders.HttpSecurity;
import org.springframework.security.config.annotation.web.configuration.EnableWebSecurity;
import org.springframework.security.crypto.bcrypt.BCryptPasswordEncoder;
import org.springframework.security.crypto.password.PasswordEncoder;
import org.springframework.security.web.SecurityFilterChain;

@Configuration
@EnableWebSecurity
public class SecurityConfig {
    @Bean
    SecurityFilterChain filterChain(HttpSecurity http) throws Exception{
        http.authorizeHttpRequests(authorizeHttpRequests -> authorizeHttpRequests.requestMatchers("/**").permitAll())
        // 새로 추가된 코드
        .formLogin(formLogin -> formLogin.loginPage("/empl/login").defaultSuccessUrl("/"));
        return http.build();
    }

    @Bean
    PasswordEncoder passwordEncoder() {
        return new BCryptPasswordEncoder();
    }
}
대충 보시면 아시겠지만 먼저 어떠한 주소든 통과할 수 있게 승인을 내린 이후 이어서 코드가 진행됩니다.
formLogin(...)
폼 로그인 방식을 사용하겠다는 뜻입니다.
로그인 할 때, 페이지에서 아이디와 비밀번호를 입력받는 방식을 사용합니다.
그 페이지를 제가 지정한 경로로 이동시킵니다.
fromLogin.loginPage("/empl/login")
로그인 페이지의 URL입니다.
사용자가 인증이 필요할 때, 자동으로 해당 주소로 이동시켜줍니다.
defaultSeccessUrl("/")
그냥 이름 그대로 로그인이 성공하면 괄호 안의 주소로 보내줍니다.
저희는 MainController을 통해서 "/" 주소는 /board/list로 전송하게 해주었기 때문에
그냥 "/"만 넣는 것으로 끝내면 됩니다.
외우기는 좀 힘들겠지만 그래도 원리 자체는 간단한 내용입니다.
이렇게 시큐리티 세팅이 끝났으면 저장하고 서버를 한번 재부팅 해주는 것이 좋습니다.
그리고 로그인을 위해서는 따로 레포지토리에서 필요한 정보를 받아,
유저 시큐리티에서 처리해주는 것이 필요합니다.
EmployeeRepository.java
package com.mysite.sbb.employee;

import org.springframework.data.jpa.repository.JpaRepository;
import java.util.Optional;

public interface EmployeeRepository extends JpaRepository<Employee, Integer>{
	// 새로 추가한 부분
    Optional<Employee> findByUsername(String username);
}
그래서 먼저 Repository를 수정해줘야합니다.
"Optional을 사용하는 이유는 무엇인가요?"
해당 값을 검색해야하는데 과연 꼭 있는 이름만 검색하게 될까요?
그것은 아닙니다. 때론 없는 아이디를 찾는 경우가 있을 수 있습니다.
그렇기 때문에 Optional로 선언하여 null 값을 방지하는 겁니다!
그리고 레포지토리를 만졌으면 서비스로 넘어가야겠죠?
그 전에 하나 만들고 가야할 것이 있습니다.
EmployeeRole.java
package com.mysite.sbb.employee;

import lombok.Getter;

@Getter
public enum EmployeeRole {
	ADMIN("ROLE_ADMIN"), USER("ROLE_USER");

	String value;
	private EmployeeRole(String value) {
		this.value = value;
	}
}
저는 유니티에서 코딩할 적에 자주 썼던 것이 enum 입니다만,
이번에 풀스택 수업을 들으면서 처음 나온 파일입니다.
유니티에서 쓰던 것과 다를까봐 조금 찾아보았는데 같은 열거 자료형이라 안심했습니다.
enum은 값이 정해진 상수들을 하나의 타입으로 묶어서 사용하는 자료형입니다.
예를 들어, 게임에서 정해진 무기 종류가 있습니다.
enum Weapon { Sword, Wand, Dagger }
이렇게 검, 단검, 지팡이를 정해두고
캐릭터의 무기를 정할 때 Weapon.Sword 같은 느낌으로 불러올 수도 있고,
직업에 따라 장착할 수 있는 무기를 더 편하게 제한할 수 있다거나 할 수 있습니다.
대충 이런식으로 권한을 정하고 관리자 계정과 일반 계정을 나눠두는 겁니다.
나중에 유저 계정은 본인의 글만 관리가 가능하지만 관리자 계정은 모든 글을 관리할 수 있는 기능이 있는 등,
그런 식으로 나누기 위한 준비인 것 같습니다.
사실 유니티에선 해당 자료형을 툴에서 보금 다르게 제공을 해주는 기능이 있었던 기억이..
대충 이정도 개념으로 넘어가면 괜찮을 것 같습니다.
이제 준비도 끝났겠다.
진짜로 서비스로 넘어가보겠습니다.
EmployeeSecurityService.java
package com.mysite.sbb.employee;

import java.util.ArrayList;
import java.util.List;
import java.util.Optional;

import org.springframework.security.core.GrantedAuthority;
import org.springframework.security.core.authority.SimpleGrantedAuthority;
import org.springframework.security.core.userdetails.User;
import org.springframework.security.core.userdetails.UserDetails;
import org.springframework.security.core.userdetails.UserDetailsService;
import org.springframework.security.core.userdetails.UsernameNotFoundException;
import org.springframework.stereotype.Service;

import lombok.RequiredArgsConstructor;

@Service
@RequiredArgsConstructor
public class EmployeeSecurityService implements UserDetailsService{
	private final EmployeeRepository employeeRepository;

	@Override
	public UserDetails loadUserByUsername(String username) throws UsernameNotFoundException {
		Optional<Employee> _employee = this.employeeRepository.findByUsername(username);

		if(_employee.isEmpty())
			throw new UsernameNotFoundException("사용자를 찾을 수 없습니다.");

		Employee employee = _employee.get();
		List<GrantedAuthority> authorities = new ArrayList<>();
		authorities.add(returnRole(username));

		return new User(employee.getUsername(), employee.getPassword(), authorities);
	}

	private SimpleGrantedAuthority returnRole(String username) {
		if("admin".equals(username))
			return new SimpleGrantedAuthority(EmployeeRole.ADMIN.getValue());
		else
			return new SimpleGrantedAuthority(EmployeeRole.USER.getValue());
	}

}
"아니, 왜 EmployeeService가 아니죠?"
그것은 서로의 역할이 다르기 때문입니다.
레포지트리, 서비스, 컨트롤러가 서로 역할이 다른 것처럼
EmployeeService와 EmployeeSecurityService의 역할은 서로 다릅니다.
EmployeeService는 보통 직원을 등록하고 추후 정보를 수정한다거나 삭제, 조회를 맡을 수 있습니다.
하지만 EmployeeSecurityService는 Spring Security에서 로그인 처리만 전담하고 있는 클래스입니다.
구체적으로, UserDetailsService를 구현해서 로그인할 때, loadUserByUsername()를 자동으로 호출해서
DB에서 해당 사용자 정보를 불러와 인증을 합니다.
또한, Spring Security에서 UserDetailsService 구현체를 반드시 별도로 요구하기 때문입니다.
Spring Security는 로그인 시 UserDetailsService의 loadUserByUsername()를 자동으로 호출해서 인증하는 과정이 있습니다.
그래서 @Service로 별도로 등록해야하고 메서드 형태와 반환 타입이 Security가 요구하는 방식이어야 합니다.
그리고 역할을 분리함으로서 유지보수와 확장성이 향상된다는 점까지 있어 나누는 것이 좋다는 편입니다.
그래서 저희가 기존에 쓰던 서비스가 아닌 시큐리티 서비스를 새로 만들어서 사용하는 것입니다.
그럼 저희가 시큐리티에서 경로 설정도 끝났고,
레포지토리도 설정이 끝났고,
서비스도 세팅이 끝났으면 무엇을 해야할까요?
컨트롤러로 매핑을 찍어줘야합니다.
EmployeeController.java
package com.mysite.sbb.employee;

import org.springframework.stereotype.Controller;
import org.springframework.web.bind.annotation.GetMapping;
import org.springframework.web.bind.annotation.PostMapping;
import org.springframework.web.bind.annotation.RequestMapping;
import org.springframework.web.bind.annotation.RequestParam;

import lombok.RequiredArgsConstructor;

@Controller
@RequiredArgsConstructor
@RequestMapping("/empl")
public class EmployeeController {
	private final EmployeeService employeeService;

	@GetMapping("/create")
	public String emplCreate() {
		return "empl_create";
	}

	@PostMapping("/create")
	public String emlpCreate(@RequestParam("username") String username, @RequestParam("password") String password, @RequestParam("nickname") String nickname, @RequestParam("email") String email) {
		this.employeeService.create(nickname, username, email, password);
		return "redirect:/";
	}

	@GetMapping("/login")
	public String emplLogin() {
		return "login_form";
	}
}
여기서 @GetMapping를 처리해줍니다.
저희가 아까 PostMapping은 시큐리티에서 처리를 해주었기 때문에
로그인 페이지로 가는 것만 연결해주면 됩니다.
login_form.html
<html layout:decorate="~{layout}">
<div layout:fragment="content" class="container my-3">
	<form th:action="@{/empl/login}" method="post">
		<div th:if="${param.error}" class="alert alert-danger">로그인 정보가
			틀렸습니다.</div>
		<label>아이디</label> <input type="text" name="username" id="username">
		<label>비밀번호</label> <input type="password" name="password"
			id="password"> <input type="submit" value="로그인">
	</form>
</div>
</html>
그리고 로그인 페이지도 간단하게 완성하고 나면?
드디어 로그인을 할 준비가 된 것입니다!
<div th:if="${param.error}" class="alert alert-danger">로그인 정보가 틀렸습니다.</div>
th:if는 타임리프에서 제공하는 if문(조건)입니다.
${param.errer}이 존재할 때에만 해당 메세지를 출력하는 것입니다.
Spring Security에서 로그인에 실패했을 경우 주소에 /empl/login?error 형태를 리다이렉트하는데,
?error이 붙어있다는 것은 param.error이 존재한다는 의미가 됩니다.
따라서 로그인에 실패했을 때에는? → 해당 메세지를 출력한다. 라는 것이 성립하게 됩니다.
# 참고로 ${param.error}는 request.getParameter("error")과 동일한 역할을 합니다.
이러면 이제 로그인이 잘 되는지 확인해볼까요?
로그인을 했다는 것이 눈에 보이지는 않지만 확인하는 방법이 하나 있습니다.

로그인이 정상적으로 되지 않았을 경우 이런 창이 뜨기 때문이죠.
이제 다음 글에서는 편의성을 좀 더 개선하고 여러가지 기능을 넣어보는 것을 중심으로 유효성 검사 추가하는 것을 해보겠습니다.